|
Entries tagged esp8266
28 January 2017 21:50
At the end of December I decided I was going to do hardware "things", and so far that has worked out pretty well.
One of the reasons I decided to play with Arduinos is that I assumed I could avoid all forms of soldering. I've done soldering often enough to know I can manage it, but not quite often enough that I feel comfortable doing so.
Unfortunately soldering has become a part of my life once again, as too many of the things I've been playing with have required pins soldering to them before I can connect them.
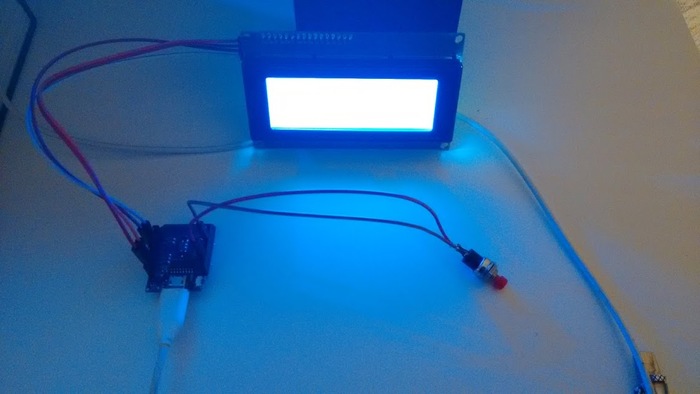
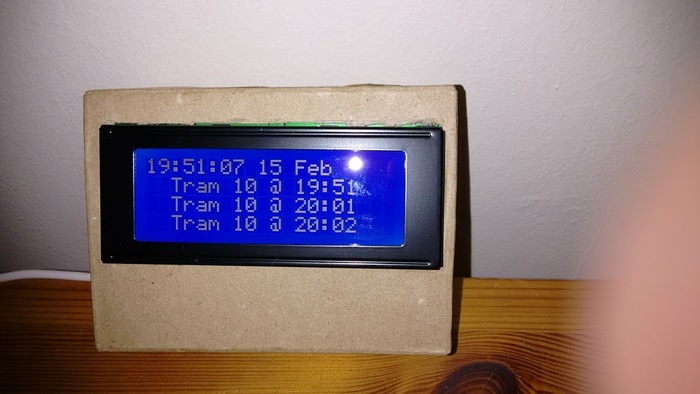
Soldering aside I've been having fun, and I have deployed several "real" projects in and around my flat. Perhaps the most interesting project shows the arrival time of the next tram to arrive at the end of my street:
That's simple, reliable, and useful. I have another project which needs to be documented which combineds a WeMos D1 and a vibration sensor - no sniggers - to generate an alert when the washing machine is done. Having a newborn baby around the place means that we have a lot of laundry to manage, and we keep forgetting that we've turned the washing machine on. Oops.
Anyway. Hardware. More fun than I expected. I've even started ordering more components for bigger projects.
I'll continue to document the various projects online, mostly to make sure I remember the basics:
Tags: arduino, esp8266
|
2 February 2017 21:50
The past few days I've been doing more arduino-work. In between dying of sleep-exhaustion.
One thing that always annoyed me was that I had to hard-code my WiFi credentials in my projects, with code like this:
//
// Connect to the SCOTLAND network
//
WiFi.mode(WIFI_STA);
WiFi.hostname("tram-clock");
WiFi.begin("SCOTLAND", "highlander1");

//
// Attempt to connect - TODO: Timeout on failure
//
while (WiFi.status() != WL_CONNECTED)
    delay(500);

//
// Now we're connected show the local IP address.
//
lcd.print("WiFi connected  ");
lcd.print(WiFi.localIP());
Whilst looking at another project I found a great solution though. There is a library called WiFiManager which behaves perfectly:
- If you've stored connection details it will connect to the local WiFI network using those, automatically.
- If you've not saved previous connection details it will instead configure the device to work as an Access Point
- You can then connect to that access point and see a list of local WiFi networks.
- Choose the appropriate one from the list, enter your password, and these details are saved for the future.
- The device will then reset, join the network via your saved choices and acquire an IP via DHCP as you'd expect.
The code for this is beautifully simple:
//
// Connect to WiFI with saved credentials, if any.
//
// Otherwise work as an access-point, named TRAM-TIMES, and
// let the user fill out their details.
//
WiFiManager wifiManager;
wifiManager.autoConnect("TRAM-TIMES");
This means my current project, which continues to revolve around tram-times, is so very much more user-friendly. It is a product you could package and take to a friends house, not a project you have to recompile to tweak.
For that reason, user-niceness, I reworked the on-board HTTP status-page to use bootstrap, be themed, and look nicer. Other than being housed in a horrid case the project actually looks like a product. Not one I'd buy, but neither one I'm ashamed of sharing.
Tags: arduino, esp8266
|
20 April 2017 21:50
I've heard about 3d-printing a lot in the past, although the hype seems to have mostly died down. My view has always been "That seems cool", coupled with "Everybody says making the models is very hard", and "the process itself is fiddly & time-consuming".
I've been sporadically working on a project for a few months now which displays tram-departure times, this is part of my drive to "hardware" things with Arduino/ESP8266 devices . Most visitors to our flat have commented on it, at least once, and over time it has become gradually more and more user-friendly. Initially it was just a toy-project for myself, so everything was hard-coded in the source but over time that changed - which I mentioned here, (specifically the Access-point setup):
- When it boots up, unconfigured, it starts as an access-point.
- So you can connect and configure the WiFi network it should join.
- Once it's up and running you can point a web-browser at it.
- This lets you toggle the backlight, change the timezone, and the tram-stop.
- These values are persisted to flash so reboots will remember everything.
I've now wired up an input-button to the device too, experimenting with the different ways that a single button can carry out multiple actions:
- Press & release - toggle the backlight.
- Press & release twice - a double-click if you like - show a message.
- Press, hold for 1 second, then release - re-sync the date/time & tram-data.
Anyway the software is neat, and I can't think of anything obvious to change. So lets move onto the real topic of this post: 3D Printing.
I randomly remembered that I'd heard about an online site holding 3D-models, and on a whim I searched for "4x20 LCD". That lead me to this design, which is exactly what I was looking for. Just like open-source software we're now living in a world where you can get open-source hardware! How cool is that?
I had to trust the dimensions of the model, and obviously I was going to mount my new button into the box, rather than the knob shown. But having a model was great. I could download it, for free, and I could view it online at viewstl.com.
But with a model obtained the next step was getting it printed. I found a bunch of commercial companies, here in Europe, who would print a model, and ship it to me, but when I uploaded the model they priced it at €90+. Too much. I'd almost lost interest when I stumbled across a site which provides a gateway into a series of individual/companies who will print things for you, on-demand: 3dhubs.
Once again I uploaded my model, and this time I was able to select a guy in the same city as me. He printed my model for 1/3-1/4 of the price of the companies I'd found, and sent me fun pictures of the object while it was in the process of being printed.
To recap I started like this:
Then I boxed it in cardboard which looked better than nothing, but still not terribly great:
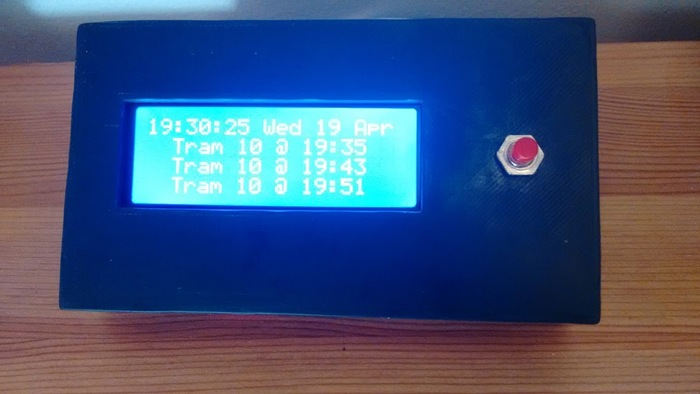
Now I've found an online case-design for free, got it printed cheaply by a volunteer (feels like the wrong word, after-all I did pay him), and I have something which look significantly more professional:
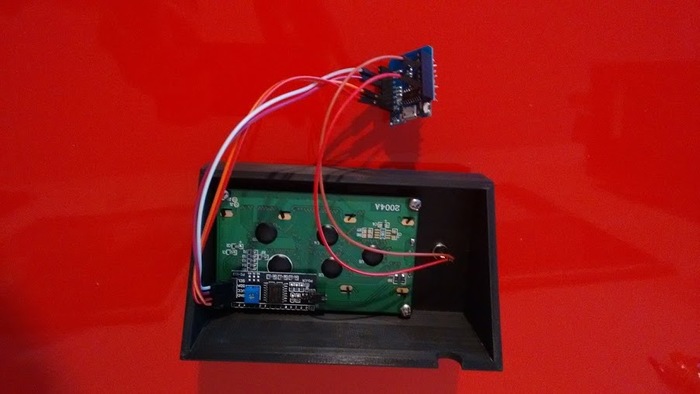
Inside it looks as neat as you would expect:
Of course the case still cost 5 times as much as the actual hardware involved (button: €0.05, processor-board €2.00 and LCD I2C display €3.00). But I've gone from being somebody who had zero experience with hardware-based projects 4 months ago, to somebody who has built a project which is functional and "pretty".
The internet really is a glorious thing. Using it for learning, and coding is good, using it for building actual physical parts too? That's something I never could have predicted a few years ago and I can see myself doing it more in the future.
Sure the case is a little rough around the edges, but I suspect it is now only a matter of time until I learn how to design my own models. An obvious extension is to add a status-LED above the switch, for example. How hard can it be to add a new hole to a model? (Hell I could just drill it!)
Tags: 3d-printing, arduino, esp8266
|
30 May 2017 21:50
3D-Printing
I continued to be impressed with local vendors, found on 3dhubs. I've had several more things printed out, including an "internet button", and some card-holders for Settlers of Catan.
The most recent print I had made was a collection of display cases, for holding an OLED display, as well as an ESP8266 device.
Unfortunately at the same time as I was falling in love with the service I discovered a glaring XSS attack against the site itself.
Anybody who viewed my profile page could have arbitrary javascript executed, which in some cases would actually disclose their private details - such as:
- Their forename & surname.
- Their email-address.
- Their telephone number.
- Their GeoIP details.
Discovering this took minutes, writing it up took an hour, and a month later it is still unfixed.
I've deleted my account.
Tags: 3d-printing, 3dhubs, esp8266
|
26 September 2017 21:50
So recently I was in York at the Bytemark office, and I read a piece about building a radio in a Raspberry Pi magazine. It got me curious, so when I got home to sunny Helsinki I figured I'd have a stab at it.
I don't have fixed goal in mind, but what I do have is:
- A WeMos Mini D1
- Cost €3.00
- ESP8266-powered board, which can be programmed easily in C++ and contains on-board WiFi as well as a bunch of I/O pins.
- A RDA5807M FM Radio chip.
- Cost 37 cents.
- With a crystal for support.
The initial goal is simple wire the receiver/decoder to the board, and listen to the radio.
After that there are obvious extenstions, such as adding an LCD display
to show the frequency (What's the frequency Kenneth), and later to show the station details, via RDS.
Finally I could add some buttons/switches/tweaks for selecting next/previous
stations, and adjusting the volume. Initially that'll be handled by pointing a
browser at the IP-address of the device.
The first attempt at using the RDA5807M chip was a failure, as the thing was too damn small and non-standardly sized. Adding header-pins to the chips was almost impossible, and when I did get them soldered on the thing just gave me static-hisses.
However I later read the details of the chip more carefully and realized that it isn't powerfull enough to drive (even) headphones. It requires an amp of some kind. With that extra knowledge I was able to send the output to the powered-speakers I have sat beside my PC.
My code is basic, it sets up the FM-receiver/decoder, and scans the spectrum. When it finds a station it outputs the name over the serial console, via RDS, and then just plays it.
I've got an PAM8403-based amplifier board on-order, when that arrives I'll get back to the project, and hookup WiFi and a simple web-page to store stations, tuning, etc.
My "token goal" at the moment is a radio that switches on at 7AM and switches off at 8AM. In addition to that it'll serve a web-page allowing interactive control, regardless of any buttons that are wired in.
I also have another project in the wings. I've ordered a software-defined radio (USB-toy) which I'm planning to use to plot aircraft in real-time, as they arrive/depart/fly over Helsinki. No doubt I'll write that up too.
Tags: esp8266, radio, youtube
|
12 October 2017 21:50
It feels like the past week or two has been very busy, and so I'm looking forward to my "holiday" next month.
I'm not really having a holiday of course, my wife is slowly returning to work, so I'll be taking a month of paternity leave, taking
sole care of Oiva for the month of November. He's still a little angel, and now that he's reached 10 months old he's starting to
get much more mobile - he's on the verge of walking, but not quite there yet. Mostly that means he wants you to hold his hands so
that he can stand up, swaying back and forth before the inevitable collapse.
Beyond spending most of my evenings taking care of him, from the moment I return from work to his bedtime (around 7:30PM), I've
made the Debian Administration website both read-only and much simpler. In the past that
site was powered by a lot of servers, I think around 11. Now it has only a small number of machines, which should slowly decrease.
I've ripped out the database host, the redis host, the events-server, the planet-machine, the email-box, etc. Now we have a much
simpler setup:
- Front-end machine
- Directly serves the code site
- Directly serves the SSL site which exists solely for Let's Encrypt
- Runs HAProxy to route the rest of the requests to the cluster.
- 4 x Apache servers
- Each one has a (read-only) MySQL database on it for the content.
- In case of future-compromise I removed all user passwords, and scrambled the email-addresses.
- I don't think there's a huge risk, but better safe than sorry.
- Each one runs the web-application.
- Which now caches each generated page to /tmp/x/x/x/x/$hash if it doesn't exist.
- If the request is cached it is served from that cache rather than dynamically.
Finally although I'm slowly making progress with "radio stuff" I've knocked up a simple hack which uses an ultrasonic sensor
to determine whether I'm sat in front of my (home) PC. If I am everything is good. If I'm absent the music is stopped and
the screen locked. Kinda neat.
(Simple ESP8266 device wired to the sensor. When the state changes a message is posted to Mosquitto, where a listener reacts
to the change(s).)
Oh, not final. I've also transfered my mobile phone from DNA.fi to MoiMobile. Which should complete soon, right now my phone is in limbo, active on niether service. Oops.
Tags: automation, esp8266
|
17 December 2017 21:50
So back in September I was talking about building a IoT Radio, and after that I switched to talking about tracking aircraft via software-defined radio. Perhaps time for a followup.
So my initial attempt at a IoT radio was designed with RDA5807M module. Frustratingly the damn thing was too small to solder easily! Once I did get it working though I found that either the specs lied to me, or I'd misunderstood them: It wouldn't drive headphones, and performance was poor. (Though amusingly the first time I got it working I managed to tune to Helsinki's rock-station, and the first thing I heard was Rammstein's Amerika.)
I made another attempt with an Si4703-based "evaluation board". This was a board which had most of the stuff wired in, so all you had to do was connect an MCU to it, and do the necessary software dancing. There was a headphone-socket for output, and no need to fiddle with the chip itself, it was all pretty neat.
Unfortunately the evaluation board was perfect for basic use, but not at all suitable for real use. The board did successfully output audio to a pair of headphones, but unfortunately it required the use of headphones, as the cable would be treated as an antenna. As soon as I fed the output of the headphone-jack to an op-amp to drive some speakers I was beset with the kind of noise that makes old people reminisce about how music was better back in their day.
So I'm now up to round 3. I have a TEA5767-based project in the works, which should hopefully resolve my problems:
- There are explicit output and aerial connections.
- I know I'll need an amplifier.
- The hardware is easy to control via arduino/esp8266 MCUs.
- Numerous well-documented projects exist using this chip.
The only downside I can see is that I have to use the op-amp for volume control too - the TEA5767-chip allows you to mute/unmute via software but doesn't allow you to set the volume. Probably for the best.
In unrelated news I've got some e-paper which is ESP8266/arduino controlled. I have no killer-app for it, but it's pretty great. I should write that up sometime.
Tags: esp8266, radio
|
6 January 2018 21:50
I finally got the radio-project I've been talking about for the past while working. To recap:
- I started with an RDA5807M module, but that was too small, and too badly-performing.
- I moved on to using an Si4703-based integrated "evaluation" board. That was fine for headphones, but little else.
- I finally got a TEA5767-based integrated "evaluatioN" board, which works just fine.
- Although it is missing RDS (the system that lets you pull the name of the station off the transmission).
- It also has no (digital) volume-control, so you have to adjust the volume physically, like a savage.
The project works well, despite the limitations, so I have a small set of speakers and the radio wired up. I can control the station via my web-browser and have an alarm to make it turn on/off at different times of day - cheating at that by using the software-MUTE facility.
All in all I can say that when it comes to IoT the "S stands for Simplicity" given that I had to buy three different boards to get the damn thing working the way I wanted. That said total cost is in the region of €5, probably about the same price I could pay for a "normal" hand-held radio. Oops.
The writeup is here:
The second project I've been working on recently was controlling a piece of ePaper via an ESP8266 device. This started largely by accident as I discovered you can buy a piece of ePaper (400x300 pixels) for €25 which is just cheap enough that it's worth experimenting with.
I had the intention that I'd display the day's calendar upon it, weather forecast, etc. My initial vision was a dashboard-like view with borders, images, and text. I figured rather than messing around with some fancy code-based grid-layout I should instead just generate a single JPG/PNG on a remote host, then program the board to download and display it.
Unfortunately the ESP8266 device I'm using has so little RAM that decoding and displaying a JPG/PNG from a remote URL is hard. Too hard. In the end I had to drop the use of SSL, and simplify the problem to get a working solution.
I wrote a perl script (what else?) to take an arbitrary JPG/PNG/image of the correct dimensions and process it row-by-row. It would keep track of the number of contiguous white/black pixels and output a series of "draw Lines" statements.
The ESP8266 downloads this simple data-file, and draws each line one at a time, ultimately displaying the image whilst keeping some memory free.
I documented the hell out of my setup here:
And here is a sample image being displayed:
Tags: epaper, esp8266, radio
|
9 February 2018 21:50
There are several projects out there designed to create an IoT button:
- You press a button.
- Magic happens, and stuff runs on your computer, or is otherwise triggered remotely.
I made my own internet-button, an esp8266-based alarm-button, and recently I've wanted to have a few more dotted around our flat. To recap, the basic way these things work is that you have a device with a button on it.
Once deployed you would press the button, your device wakes up, connects to your WiFi and sends a "message". That message then goes on to trigger some kind of defined action. In my case my button would mute any existing audio-playback, then trigger the launch of an "alarm.mp3" file. In short - if somebody presses the button I would notice.
I wanted a few more doing slightly more complex things in the flat, such as triggering lights and various programs. Unfortunately these buttons are actually relatively heavy-weight, largely because connecting to WiFi demands a reasonable amount of power-draw. Even with deep-sleeping between invocations, driving such a device from battery-power means the life-span is not great. (In my case I cheat, my button is powered by a small phone-charger, which means power isn't a concern, but my "button" is hobbled.)
Ideally what everybody wants is security, simplicity, and availability. Running from batteries, avoiding the need to program WiFi credentials and having a decent form-factor makes an IoT button a lot simpler to sell - you don't need to do complicated setup, and things are nice and neat.
So I wondered is such an impossible dream actually possible, and it turns out that yes, such a device is trivial.
Instead of building WiFi into a bunch of buttons you could you build the smarts into one device, a receiver, connected to your PC via a USB cable - the buttons are very very simple, don't use WiFi, don't need to be programmed, and don't draw a lot of current. How? Radio.
There exist pre-packaged and simple radio-based buttons, such as this one:
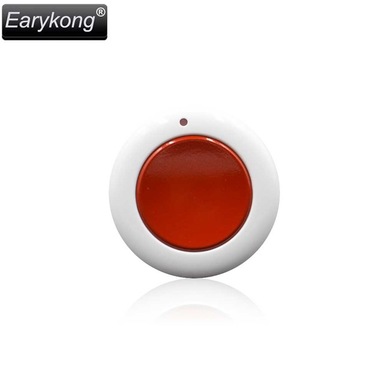
You press a button and it broadcasts a simple message on 433Mhz. There exist very cheap and reliable 433Mhz recievers which you can connect to an arduino, or ESP8266-based device. Which means you have a different approach:
- You build a device based upon an Arduino/ESP8266/similar.
- It listens for 433Mhz transmissions, decodes the device ID.
- Once it finds something it recognizes it can write to STDOUT (more or less)
- The host system opens
/dev/ttyUSB0 and reads the output
- Which it can then use to trigger actions.
The net result is you can buy a bunch of buttons, for €5 each and add them to your system. The transmissions are easy to decode, and each button has a unique ID. You don't need to program them with your WiFi credentials, or set them up - except on the host - and because these devices don't do much, they just sleep waiting for a press, make a brief radio-transmission, then go back to sleep, their batteries can last for months.
So that's what I've done. I've written a simple program which decodes the trasmissions and posts to an MQ instance "button-press-a", "button-press-b", etc, and I can react to them uniquely. (In some cases the actions taken depend upon the time of day.)
No code to show here, because it depends upon the precise flavour of button(s) that you buy. But I had fun because some of the remote-controls around my house use the same frequency - and a lot of the cheap "remote-controlled power-switches" use this fequency too. If you transmit as well as receive you can have a decent amount of fun. :)
Of course radio is "broadcast", so somebody nearby could tell I've pressed a button, but as far as security goes there are no obvious IoT-snafus that I think I care about.
In my next post I might even talk about something more interesting - SMS-based things. In Europe (data)-roaming fees have recently been abolished, and anti-monopoly regulations make it "simple" to get your own SIMs made. This means you can buy a bunch of SIMS, stick them in your devices and get cheap data-transfer Europe-wide. There are obvious commercial aspects available if you go down this route, if you can accept the caveat that you need to add a SIM-card to each transmitter and each receiver. If you can a lot of things that become possible, especially when coupled with GPS. Not only do you gain the ability to send messages/events/data, but you can see where it came from, physically/geographically, and that is something that I think has a lot of interesting use-cases.
Tags: esp8266, iot
|
11 February 2018 21:50
This blog-post is a bit of a diversion, and builds upon my previous entry of using 433Mhz radio-transmitters and receivers with Arduino and/or ESP8266 devices.
As mentioned in my post I've recently been overhauling my in-house IoT buttons, and I decided to go down the route of using commercially-available buttons which broadcast signals via radio, rather than using IR, or WiFi. The advantage is that I don't need to build any devices, or worry about 3D-printing a case - the commercially available buttons are cheap, water-proof, portable, and reliable, so why not use them? Ultimately I bought around ten buttons, along with a radio-receiver and radio-transmitter modules for my ESP8266 device. I wrote code to run on my device to receive the transmissions, decode the device-ID, and take different actions based upon the specific button pressed.
In the gap between buying the buttons (read: radio transmitters) and waiting for the transmitter/receiver modules I intended to connect to my ESP8266/arduino device(s) I remembered that I'd previously bought a software-defined-radio receiver, and figured I could use it to receive and react to the transmissions directly upon my PC.
The dongle I'd bought in the past was a simple USB-device which identifies itself as follows when inserted into my desktop:
  [17844333.387774] usb 3-9: New USB device found, idVendor=0bda, idProduct=2838
  [17844333.387777] usb 3-9: New USB device strings: Mfr=1, Product=2, SerialNumber=3
  [17844333.387778] usb 3-9: Product: RTL2838UHIDIR
  [17844333.387778] usb 3-9: Manufacturer: Realtek
  [17844333.387779] usb 3-9: SerialNumber: 00000001
At the time I bought it I wrote a brief blog post, which described tracking aircraft, and I said "I know almost nothing about SDR, except that it can be used to let your computer do stuff with radio."
So my first step was finding some suitable software to listen to the right-frequency and ideally decode the transmissions. A brief search lead me to the following repository:
The RTL_433 project is pretty neat as it allows receiving transmissions and decoding them. Of course it can't decode everything, but it has the ability to recognize a bunch of commonly-used hardware, and when it does it outputs the payload in a useful way, rather than just dumping a bitstream/bytestream.
Once you've got your USB-dongle plugged in, and you've built the project you can start receiving and decoding all discovered broadcasts like so:
  skx@deagol ~$ ./build/src/rtl_433 -U -G
  trying device  0:  Realtek, RTL2838UHIDIR, SN: 00000001
  Found Rafael Micro R820T tuner
  Using device 0: Generic RTL2832U OEM
  Exact sample rate is: 250000.000414 Hz
  Sample rate set to 250000.
  Bit detection level set to 0 (Auto).
  Tuner gain set to Auto.
  Reading samples in async mode...
  Tuned to 433920000 Hz.
  ...
Here we've added flags:
-G
- Enable all decoders. So we're not just listening for traffic at 433Mhz, but we're actively trying to decode the payload of the transmissions.
-U
Leaving this running for a few hours I noted that there are several nearby cars which are transmitting data about their tyre-pressure:
  2018-02-10 11:53:33 :      Schrader       :      TPMS       :      25
  ID:          1B747B0
  Pressure:    2.500 bar
  Temperature: 6 C
  Integrity:   CRC
The second log is from running with "-F json" to cause output to be generated in JSON format:
  {"time" : "2018-02-10 09:51:02",
   "model" : "Toyota",
   "type" : "TPMS",
   "id" : "5e7e0637",
   "code" : "63e6026d",
   "mic" : "CRC"}
In both cases we see "TPMS", and according to wikipedia that is Tyre Pressure Monitoring System. I'm a little shocked to receive this data, unencrypted!
Other events also become visible, when I left the scanner running, which is presumably some kind of temperature-sensor a neighbour has running:
  2018-02-10 13:19:08 : RF-tech
     Id:              0
     Battery:         LOW
     Button:          0
     Temperature:     0.0 C
Anyway I have a bunch of remote-controlled sockets, branded "NEXA", which look like this:
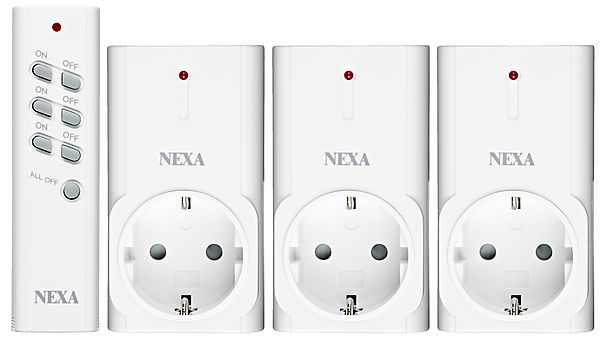
When I press the remote I can see the transmissions and program my PC to react to them:
  2018-02-11 07:31:20 : Nexa
    House Code:  39920705
    Group:  1
    Channel: 3
    State:   ON
    Unit:    2
In conclusion:
- SDR can be used to easily sniff & decode cheap and commonly available 433Mhz-based devices.
- "Modern" cars transmit their tyre-pressure, apparently!
- My neighbours can probably overhear my button presses.
Tags: esp8266, iot, sdr
|
6 June 2019 12:01
Recently I wanted to monitor the temperature and humidity of a sauna. I figured the safest way to go would be to place a battery-powered temperature/humidity sensor on a shelf, the kind of sensor that is commonly available on AliExpress for €1-5 each.
Most of the cheap "remote sensors" transmit their data over a short 433Mhz radio-transmission. So I just assumed it'd be possible to work something out.
The first step was to plug an SDR-dongle into my laptop, that worked just fine when testing, I could hear "stuff". But of course a Sauna is wood-lined, and beyond a tiled-shower area. In practice I just couldn't recieve the signal if my laptop lived in its usual location.
So I came up with a fall-back plan:
- Wire a 433Mhz receiver to an ESP8266 device.
- Sniff the radio-transmission.
- Decode it
- Inject into an MQ-host, via WiFi
Since the receiver could be within 10m of the transmitter I figured that would work fine - and it did. The real problem came when I tried to do this. There are a few projects you can find for acting as a 433Mhz -> WiFi bridge and none of them understood the transmission(s) my sensor was submitting.
In the end I had to listen for packets, work out the bit-spacing, and then later work out the actual contents of the packets. All by hand.
Anyway the end result is that I have something which will sniff the packets from the radio-transmitter, correctly calculate the temperature/humidity values and post them to MQ. From MQ a service polls the values and logs them to SQLite for later display. As a bonus I post to Slack the first time the temperature exceeds 50 °ree; a day:
- "Hot? It's like a sauna in here."
- "Main steam on, somebody set us up the beer."
- etc.
Next week I'll talk about how I had a similar (read: identical) problem reacting to the 433Mhz transmission triggered by a doorbell. None of the gateways I looked at logged a thing when the button was pressed. So I'll have to save the transmission via rtl_433, analyze it with audacity, and do the necessary.
For reference these are the three existing firmwares/solutions/projects I tried; on a Wemos Mini D1:
Tags: 433mhz, arduino, esp8266, radio, sdr
|
|
